


1.CONSTRUCTION OF TRIANGLES
Any one of the following sets of measurements are required to construct a triangle
• Length of the three sides
• Two sides and the included angle
• Two angles and the included side
• Length of the hypotenuse and one side in case of a right-angled triangle.
Construction of a triangle when measurements of its three sides are given
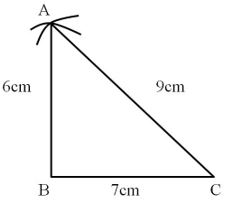
Construct ΔABC, when AB = 6 cm, BC = 7 cm and CA = 9 cm.
Steps of construction:
Step 1: Draw line segment BC = 7 cm.
Step 2: Draw an arc with B as the centre and the radius equal to 6 cm.
Step 3: Draw an arc with C as the centre and the radius equal to 9 cm.
Step 4: Name the point of intersection of these two arcs as A.
Step 5: Join points A and B, and points A and C.
Triangle ABC is the required triangle.
Construction of a triangle when measurements of two sides and the included angle are given
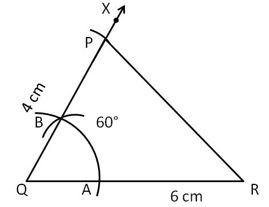
Construct ΔPQR, when PQ = 4 cm, QR = 6 cm and ∠PQR = 60°.
Steps of construction:
Step 1: Draw line segment QR = 6 cm.
Step 2: Construct an angle of 60° at point Q.
Step 3: Draw an arc on the ray QX with Q as the centre and the radius equal to 4 cm.
Step 4: Name the point where the arc cuts ray QX, as P.
Step 5: Join points P and R.
Triangle PQR is the required triangle.
Construction of a triangle, when two angles and the included side are given
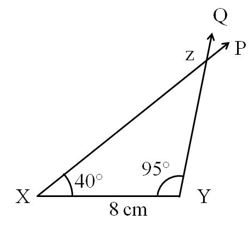
Construct ΔXYZ, when ∠ZXY = 40°, ∠XYZ = 95° and the included side XY = 8 cm.
Steps of construction:
Step 1: Draw line segment XY = 8 cm.
Step 2: Construct an angle of 40° at X with XY.
Step 3: Construct another angle of 95° at Y with YX.
Step 4: Name the point of intersection of the two rays as Z.
Triangle XYZ is the required triangle.
Construction of a right-angled triangle, when the length of one side and the hypotenuse are given
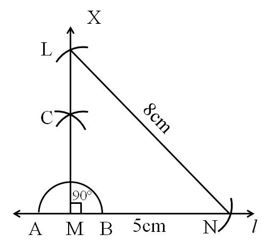
Construct a right-angled triangle LMN, with hypotenuse LN = 8 cm and side MN = 5 cm.
Steps of construction:
Step 1: Draw line ‘l‘.
Step 2: Mark a point on ‘l‘ and name it M.
Step 3: Draw a line segment MN = 5 cm on ‘l‘ .
Step 4: Construct a right angle XMN at M.
Step 5: Draw an arc with N as the centre and radius equal to 8 cm, such that it intersects MX.
Step 6: Mark the point of intersection as L.
Step 7: Join points L and N.
Triangle LMN is the required triangle.
2. CONSTRUCTION OF PARALLEL LINES
Two lines in a plane that never meet each other at any point are said to be parallel to each other.
Any line intersecting a pair of parallel lines is called a transversal.
Properties of angles formed by parallel lines and transversal
• All pairs of alternate interior angles are equal.
• All pairs of corresponding angles are equal.
• All pairs of alternate exterior angles are equal.
• The interior angles formed on the same side of the transversal are supplementary (the sum of their measures is 180°).
Construction of a parallel line using the alternate interior angle property

Step 1: Draw line ‘l’ and point A outside it.
Step 2: Mark point B on line ‘l’.
Step 3: Draw line ‘n’ joining point A and point B.
Step 4: Draw an arc with B as the centre, such that it intersects line ‘l’ at D and line ‘n’ at E.
Step 5: Draw another arc with the same radius and A as the centre, such that it intersects line ‘n’ at F. Ensure that arc drawn from A cuts the line ‘n’ between A and B.
Step 6: Draw another arc with F as the centre and distance DE as the radius.
Step 7: Mark the point of intersection of this arc and the previous arc as G.
Step 8: Draw line ‘m’ passing through points A and G.
Line ‘m’ is the required parallel line.
Verification of the construction
If the pair of alternate interior angles are equal in measure, then line ‘m’ is parallel to line ‘l‘.
Construction of a parallel line using the corresponding angle property
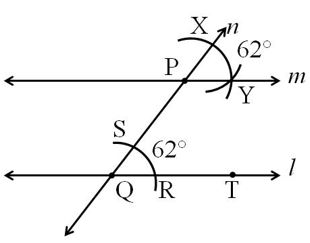
Step 1: Draw line ‘l’ and point P outside it.
Step 2: Mark point Q on line ‘l’.
Step 3: Draw line ‘n’ joining point P and point Q.
Step 4: Draw an arc with Q as the centre, such that it intersects line ‘l’ at R and line ‘n’ at S.
Step 5: Draw another arc with the same radius and P as the centre, such that it intersects line ‘n’ at X. Ensure that arc drawn from P cuts the line ‘n’ outside QP.
Step 6: Draw another arc with X as the centre and distance RS as the radius, such that it intersects the previous at Y.
Step 7: Draw line ‘m’ passing through points P and Y.
Line ‘m’ is the required parallel line.
Verification of the construction
If the pair of corresponding angles are equal in measure, then line ‘m’ is parallel to line ‘l‘.