


1. BASIC CONSTRUCTIONS
We use mathematical instruments such as ruler, compass, divider, set squares, and protractor to construct different shapes in geometry.
Using these instruments, we can construct:
- a circle if its radius is known
- a line segment if its length is known
- a copy of a line segment
- a perpendicular to a line segment through a point on it
- a perpendicular to a line segment through a point not on it
- a perpendicular bisector of a line segment
- an angle of a given measure using protractor
- a copy of an angle
- the bisector of a given angle
- some angles of special measures such as 30°, 45°, 60°, 90°, 120°, 135°, etc
Ruler
A ruler is a flat and straight-edged strip, whose one side is graduated into centimetres and the other into inches. A ruler is commonly called a scale. It is the most essential tool in geometry. It is used in all constructions.
The basic uses of a ruler are:
Measuring lengths of line segments
Drawing line segments
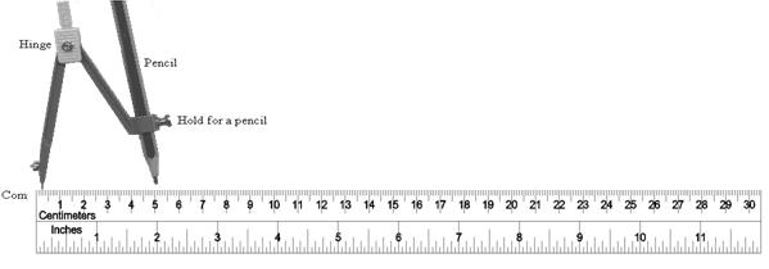
Compass
A compass has two ends. One end holds a pointer, while the other end holds a pencil. It is also called a pair of compasses.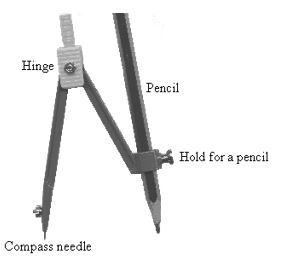
The basic uses of a compass are:
Marking off equal lengths
Drawing arcs
Drawing circles
Divider
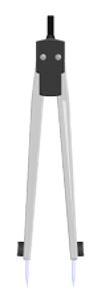
A divider is a tool similar in shape to a compass. It has a pair of pointer ends.
The basic uses of a divider are:
Comparing lengths of line segments
Helping avoid positioning errors
Taking accurate measurements
Set squares
The two triangular tools in the geometry box are called set squares. One of the set squares is an isosceles triangle with two angles measuring 45° each. The other set square is a scalene triangle with two angles measuring 30° and 60° each. The two perpendicular sides of either set square are graduated into centimetres.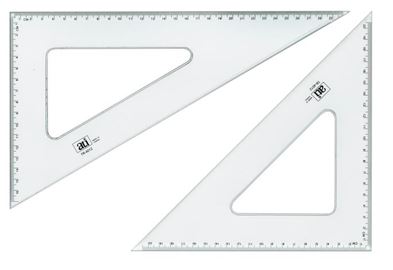
The basic uses of set squares are:
Drawing perpendicular lines
Drawing parallel lines
Protractor
A semi-circular tool with degrees marked is called a protractor. The centre of the semicircle is called the midpoint of the protractor. This point helps as a reference point for the protractor. The horizontal line is called the base line or the straight edge of the protractor.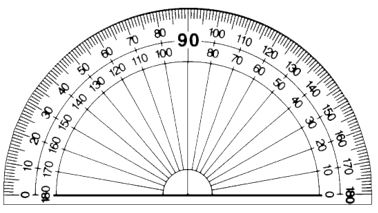
The basic uses of a protractor are:
Measuring angles
Drawing angles
The important points to be remembered while using the tools for construction are:
Draw smooth and thin lines
Mark points lightly
Maintain tools or instruments with sharp pointers and fine edges
Keep two pencils in the box. One is for drawing lines and marking points. The other is for using in the compass
Drawing a line segment of given length
Place the ruler on a drawing paper.
Mark point A at the zero of the ruler.
Count the divisions in the ruler till you reach the required length.
Mark the point as B.
Join points A and B.
AB is the required line segment of length 10 cm.
Drawing a circle with a given radius
Drawing a circle of radius 5 cm.
Set the compass to the desired radius, say 5 cm.
Mark point O.
Place the pointer end of the compass at point O.
Make a complete round with the pencil end of the compass, keeping the pointer at the same position.
The required circle of radius 5 cm is obtained.
2. CONSTRUCTION OF LINES
Construction of a line segment of given length
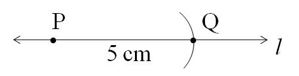
Steps to construct a line segment of length 5 cm:
Draw line l.
Mark a point on line and name it as P.

Open the compass to measure the length of the line segment by placing the pointer on the 0 mark of the ruler and the pencil point on the 5 cm mark.
Place the pointer of the compass on point P and swing an arc on the line to cut it at Q.

is the required line segment of length 5 cm.
Construction of copy of a given line segment:
Construction of a copy of line segment PQ.
Keep the compass pointer on P and the pencil on Q.
- Draw line m.
- Mark a point R on the line m.
- Place the pointer of the compass on point R without changing its settings.
- Swing an arc cutting line m.
- Mark the point where the arc cuts the line, as S.
- Line segment RS is the required copy of line segment PQ.
- Two lines are said to be perpendicular when they intersect each other at an angle of 90°.
Construction of perpendicular lines
Construction of perpendicular to given line at a point on the line:
- ‘l’ is a line and O is a point on it.
- Draw a semi-circle with a convenient radius and ‘O’ as the centre.
- Mark the points of intersection of the semi-circle and line l as P and Q.
- Draw an arc with a radius greater than PO and P as the centre.
- Draw another arc with the same radius and Q as the centre, so that it intersects the previous arc.
- Mark the point of intersection of the arcs as X.
- Join points O and X.
- Line OX is the required perpendicular to line ‘l’.
- Construction of perpendicular to given line from a point outside the line:
- ‘l’ is a line and R is a point outside the line.
- Draw an arc with R as the centre and a convenient radius.
- Mark the points of intersection of the arc and line l as P and Q.
- Draw an arc on the side opposite to R with the same radius and P as the centre.
- Draw another arc with the same radius and Q as the centre so that it intersects the previous arc.
- Name the point of intersection of the two arcs as S.
- Join points R and S.
- Line RS is the required perpendicular to the given line ‘l’ passing through point R.
-
The perpendicular bisector is a perpendicular line that bisects another line into two equal parts.
Construction of perpendicular bisector of line segment:
- Draw a line segment and name it as PQ.
- Open the compass for a radius more than half the length of PQ.
- Draw a circle with P as the centre.
- Draw another circle with the same radius and the centre as Q .
- Name the points of intersection of the two circles as R and S.
- Join points R and S.
- Name the point at which RS intersects PQ as M .
- RS is the perpendicular bisector of PQ.
3. CONSTRUCTION OF ANGLES
Construction of copy of an angle
An exact copy of a line segment can be constructed using a ruler and a compass.
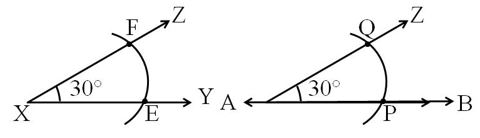
Construction of a copy of an angle YXZ.
- Draw a line AB.
- Mark any point O on AB.
- Place the compass pointer at vertex X of the given figure and draw an arc with a convenient radius, cutting rays XY and XZ at points E and F, respectively.
- Without changing the compass settings, draw an arc on line AB from point O. It cuts line AB at P.
- Set the compass to length EF.
- Without changing the compass settings, draw an arc from P cutting the previous arc at point Q.
- Join points O and Q.
Hence, ∠POQ is the required copy of ∠YXZ.
Construction of the bisector of an angle
Construction of the bisector of an angle LMN.
- Place the compass pointer at vertex M of the given angle.
- Draw an arc cutting rays ML and MN at U and V respectively.
- Draw an arc with V as the centre and a radius more than half the length of UV in the interior of ∠LMN
- Draw another arc with U as the centre and the same radius intersecting the previous arc.
- Name the point of intersection of the arcs as X.
- Join points M and X.
- Ray MX is the required bisector of ∠LMN
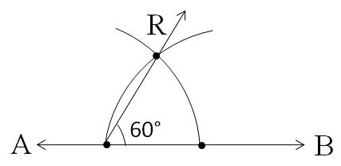
Construction of a 60° angle:
- Draw a line.
- Mark a point P on the line.
- Draw an arc from point P with a convenient radius cutting the line at a point.
- Name the point of intersection of the arc and the line as Q.
- Draw another arc with Q as the centre and the same radius so that it passes through point P.
- Name the point of intersection of the two arcs as R.
- Join points P and R.
- Ray PR forms an angle with ray PQ at point P, which measures 60°.
- ∠QPR is the required angle measuring 60°.
Construction of a 30° angle:
To obtain a 30° angle, we need to bisect a 60° angle.
- Draw an arc with Q as the centre and a radius more than half the length of QR.
- Draw another arc with R as the centre without changing the compass settings so that it intersects the previous arc.
- Name the point of intersection of the arcs as S.
- Join points P and S.
- ∠QPS is the required angle measuring 30°.
- In a similar way, we can construct a 120° angle and 90° angle without using the protractor.
Construction of a 120° angle
- Draw line XY.
- Mark a point on the line and name it as P.
- Draw an arc with P as the centre and a convenient radius so that it cuts the line at Q.
- Draw another arc with Q as the centre without changing the compass settings so that it intersects the first arc at R.
- Draw another arc with R as the centre without changing the compass settings so that it intersects the first drawn arc at point S.
- Join points P and S.
- ∠SPQ is the required angle measuring 120°.
Construction of a 90° angle
- Draw line land mark point P on it.
- Draw an arc with P as the centre and a convenient radius cutting line l at Q.
- Draw another arc with Q as the centre and the same radius cutting the first arc at R.
- Draw an arc with R as the centre and the same radius cutting the first arc at S.
- Join points P and R.
- Join points P and S.
- 90° lies to the centre of 60° and 120°.
- Draw an arc with R as the centre and a radius more than half the length of RS in the interior of ∠RPS
- Draw another arc with S as the centre and the same radius so that it intersects the previous arc at T.
- Join points P and T.
- PT is the perpendicular line to PQ.
- ∠QPT is the required angle measuring 90°.